When working with estimation projects, understanding various parts of the project page and user interface will help you get oriented quickly. Let’s start with the “big pieces”.

If you open an existing estimation project with a valid solution, the first thing you’ll see is that most of the “project page” is occupied by charts and reports displaying information about the project. SLIM-Collaborate remembers the last dashboard you used when working with an estimation project and displays that dashboard by default when you open another project in the same lifecycle stage.
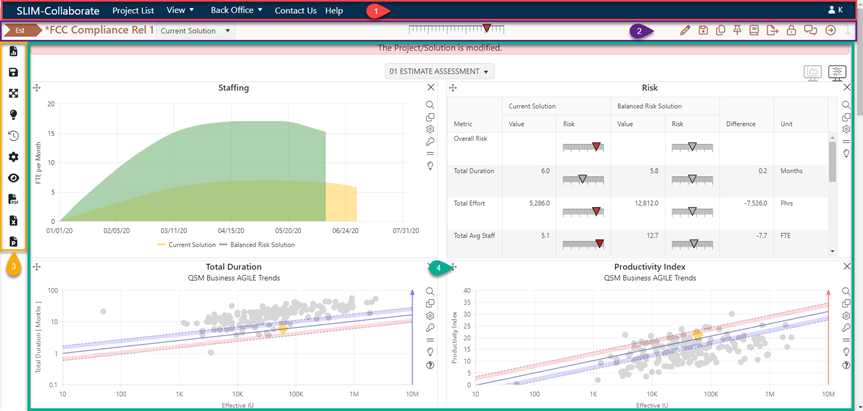
Across the top of the page are two horizontal bars. The top bar (1) with the navy blue background is the SLIM-Collaborate menu bar. The white bar just under it (2) is the project actions toolbar. Below that are the dashboard toolbar (3) and the dashboard area itself (4). Because you will see these elements when working with projects in both the estimation and closeout stages, they are covered in detail in other topics in the online help. Below, you will find a brief description of each element, followed by a link to more detailed coverage:
1. The SLIM-Collaborate site menu bar provides access to the rest of the site, displays the currently logged in user’s name (right side) and has a link you can use to log out of SLIM-Collaborate. See What's on the Menu for more details.
2. The project toolbar contains project information (project name, lifecycle stage, locked/unlocked status, and a folder icon if the project has been archived), a drop-down selection list used to reload logged solutions (make them current), a risk meter, and project icons you’ll use to work with the current estimation project. Because estimation and closeout toolbars differ, the Estimation Project Toolbar topic in this help chapter is where you’ll find detailed explanations of the icons and other elements.
3. The dashboard toolbar runs vertically down the left-hand side of the page. It contains icons used to create, edit, save, and work with the current project dashboard. If the current solution is incomplete, the dashboard toolbar will not be displayed because there is no current dashboard to work with! Dashboard toolbar functions are covered in the Dashboards section of this user guide.
4. The dashboard area displays charts and reports, grouped into public and private dashboards, used to analyze the project you’re working with. If the current solution is incomplete or no charts/reports have been added to the current dashboard, this area will be blank. See the Dashboard User Interface topic for details.
User interface elements common to projects in the estimation and closeout stages - the SLIM-Collaborate menu bar, dashboard toolbar, and dashboard area - are covered in detail in the linked topics above. We’ll explore the project toolbar – which is unique to the estimation service – in the next topic.