If you selected Create New Project from Template icon | Estimation | Design to Goal method, or selected the Design to Goal solution method while working with an existing project, the input fields on the right-hand side of the Assumptions tab will display the required inputs for this solution method. You can expect slightly different initial data, depending on whether there was a previous solution in place when you selected this solution method.
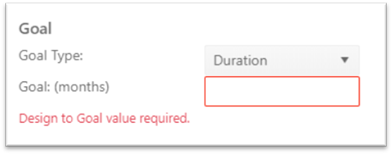
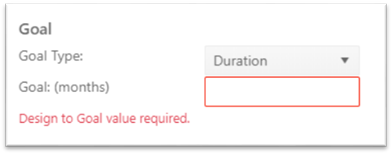
If you started from a new project, the pink error
banner across the bottom of the Assumptions tab and the red outline and
validation text on the Goal field are provided to help you focus on the inputs
required to generate a valid Design to Goal solution. The two errors are
Incomplete Data errors (missing inputs). You will be allowed to OK and save a
project with incomplete data, but not one with incorrect (out of range or
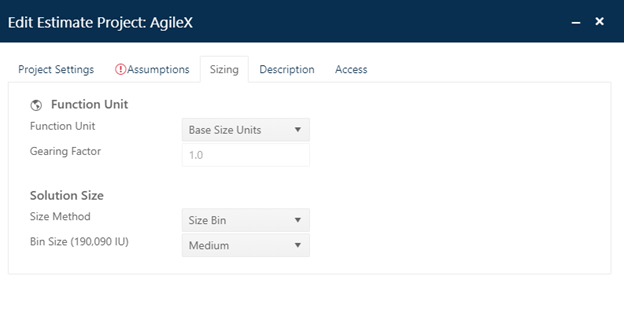
invalid) data errors. The sizing technique (set via the Sizing tab) will default
to a Size Bin from the project’s selected trend group and the initial size bin
value will be “Unknown”. You will see a (size is invalid) label on
the Assumptions tab and an Incomplete Data Error (Sizing tab) across the
bottom of the Assumptions tab. This is your signal to go to the Sizing tab and
provide a size estimate! See the Sizing Tab topic for detailed guidance on creating a
size estimate.
If you have previously generated a valid solution, then
returned to the Edit Estimate Project dialogs to create a Design to Goal
solution, the input fields will contain some data from the current solution. The
size field and Sizing Tab will display the current solution size value and
sizing method, and the goal field will default to a staffing goal with no
staffing value supplied. You can, of course, change the goal type, depending on
what kind of target you have for the project. Note that because the current
solution was valid when you edited the project, there is no incomplete size
error – just an incomplete goal error. The red validation text below the
Goal field prompts you to supply a value.
The fields on the Assumptions tab are covered in greater detail at the links below. Specific guidance for the Feasibility solution method is provided below where appropriate.
•Project Start Date. This field will default to the current date, but you should enter the first day of the first active phase of your project.
•Phase Tuning Override. If you select the Use Phase Tuning from Trends checkbox, SLIM-Collaborate will override the phase tuning settings in the project’s phase tuning configuration set with average phase tuning settings from the primary trend group associated with the project. This is useful when you want to calibrate phase duration, effort, and overlap to the primary trend group. Note that if Phase 4 is active, the Phase 4 tuning will still use the project configuration set tuning even if the override checkbox is checked. The trend tuning values override only applies to Phase 1, Phase 2, and Phase 3 tuning factors.
•Size. For new projects, the size label displayed on the Assumptions tab is taken from the Size Bin method (a selected size bin, from your project’s Trend Group). Trend based solutions default to “Unknown”. After a valid solution has been created, the size will default to the current solution value (and sizing method). To change the current size, go to the Sizing tab.
•Goal. Select a Goal Type from the first dropdown list
control, then enter your desired schedule or resource goal in the second field
provided. When you select a Goal Type, the label field for the Goal will show
the expected unit (months, hrs, monetary unit, or FTEs). Red validation text
will alert you to missing (required) or incorrect (out of range/invalid) inputs.
When you enter a goal, the value you
provide should all lifecycle phases and activities. To review or edit the
included phases, use the Project Settings tab.