There are several ways to add new closeout project records to your SLIM-Collaborate portfolio. Project records originally created in SLIM-DataManager can be imported into SLIM-Collaborate by a user with Back Office permissions, users can advance estimation projects to the closeout stage and then update the project’s estimated time, effort, size, and defect data with values that reflect actual (rather than estimated) performance, or copy (clone) a closeout project from the project list icon or project toolbar. What these methods have in common is that the user isn’t creating the project “from scratch”, but rather starting from an existing project record.
To create a single closeout project, use the "Create New Project from Template" icon located in the top right toolbar of the Project List page. Note that this icon is only visible to users with Manage Projects permissions in their default role.

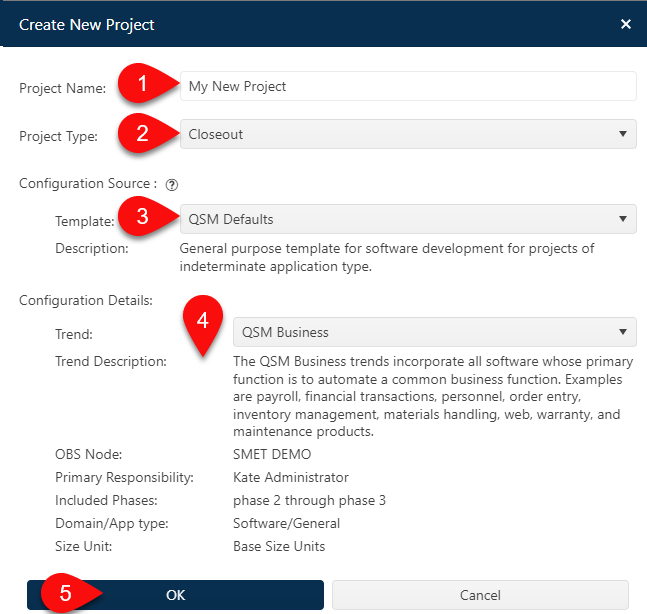
The Create New Project dialog will appear.

Follow these steps to configure your new project record:
1.
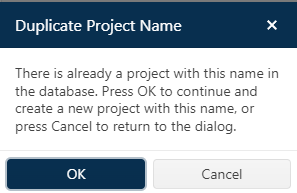
Type in a project name. If there is already a project in your portfolio
with the same name, you will be prompted to confirm that you want to create a
new project with a duplicated name. The message comes up when you click OK to
create your new project – you will have the opportunity to Cancel and edit the
project name or OK to proceed and keep the duplicated project
name.

2. Select “Closeout” for the Project Type. Selecting Feasibility or Estimation will result in a new project record in the Estimation stage.
3. Review Configuration Details. To help you select the template that best matches your desired project settings, a subset of the values from your chosen template is displayed. You can override the template’s trend group using the drop-down control if desired. The other metric values can be edited manually once the project has been created.
4. Select a Template (Configuration Source). This option initializes fields on the Project Settings, Sizing Unit, Description, and Access tabs to match preconfigured values from the selected template. Since templates are generic in nature, you should review data imported from the template and update any fields that need adjusting once the project has been created. NOTE; starting with SLIM-Collaborate 5.0, the “Existing Project” option has been moved to a separate icon in the project list grid.
5. OK
to create and display the new project record.
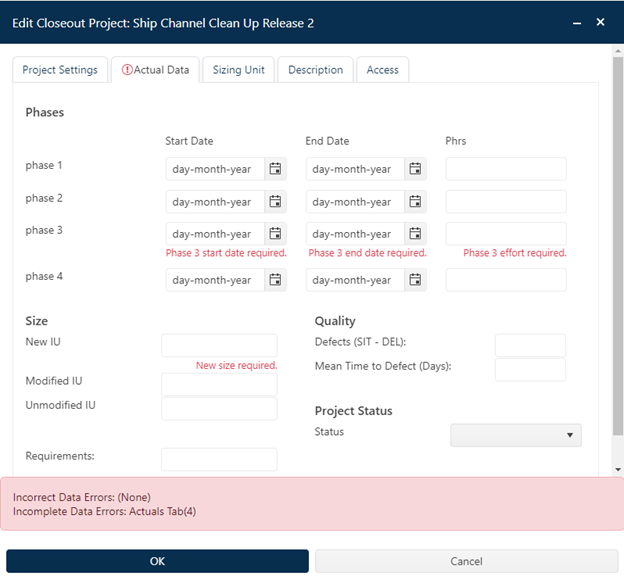
When you click the OK button, you will be taken to your new project record, the Edit dialog will appear, and you will be taken to the Actual Data tab, where you can enter the final, actual performance data (schedule, effort, size, defects) for your closeout project.

Because no final or actual performance data (schedule, effort, completed size) has yet been entered for your new project, the solution is incomplete. Several error messages – in red text – highlight the minimum data required to calculate and save a valid closeout project.
•Effective size (new and/or modified)
•Phase 3 start/end dates
•Phase 3 effort
You can save the project with incomplete data, but you
will not be able to display Closeout dashboard charts and reports or calculate
performance metrics like PI (Productivity Index) until you have entered the
minimum required data highlighted on this tab.
For more detailed, field-by-field instructions on entering
closeout data, see the Entering or Editing Actual Data
section of this user guide. Detailed information on reviewing or filling out
other project attributes (descriptive information about the project) is
available in the Editing or Entering Project
Settings section.