There are several ways to add new estimation project records to your SLIM-Collaborate portfolio:
•Import one or more existing SLIM-Estimate files. Project records originally created in SLIM-Estimate can be imported into SLIM-Collaborate via the Back Office | Import Project | Import Estimation Project menu item. These menu options will be visible to users with Full Access permissions to the Back Office or Estimation service in their default user role. For more information, see the Importing Estimation Projects topic in this user guide.
•Clone an existing project. Users with sufficient permissions can copy (clone) an estimation or closeout project from the project list icon or project toolbar.
•Create a new project using icons on the project list
page.
What the first two methods have in common is that the user isn’t creating the project “from scratch”, but rather starting from an existing project record. If you’ve just cloned a project or imported an estimate solution previously created in SLIM-Estimate, your work may already be done! You should review the imported or cloned solution and make any needed adjustments to the project’s access settings, but in most cases your new project record is ready to work with in SLIM-Collaborate.
To create a new estimation project, use the "Create New Project from Template" icon located in the top right toolbar of the Project List page. Note that this icon is only visible to users with Manage Projects permissions in their default role.

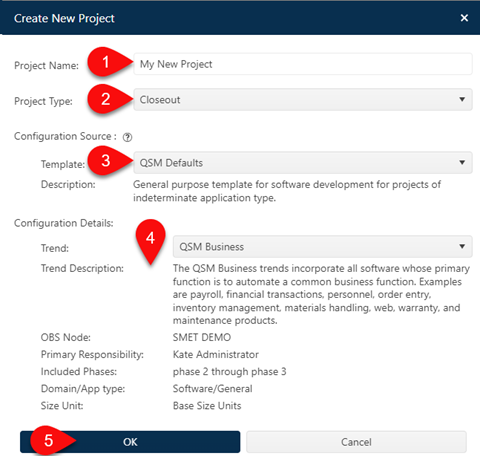
The Create New Project dialog will appear.

Follow these steps to configure your new project
record:
1.
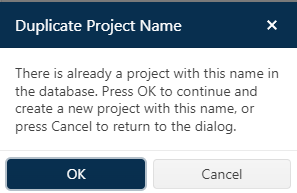
Type in a project name. If there is already a project in your
portfolio with the same name, you will be prompted to confirm that you want to
create a new project with a duplicated name. The message comes up when you click
OK to create your new project – you will have the opportunity to Cancel and edit
the project name or OK to proceed and keep the duplicated project
name.

2. Select a Project Type. The two Estimation options are Feasibility (defaults to the Feasibility solution method, which creates early bids or proposals using a few simple inputs) and Estimation (same user interface, but the solution method defaults to Trend Based). Don’t worry – you can easily change solution methods once the project is created!
3. Select Configuration Source (Template). This option initializes fields on the Project Settings, Sizing Unit, Description, and Access tabs to match preconfigured values from the selected template. Since templates are generic in nature, you should review data imported from the template and update any fields that need adjusting once the project has been created. NOTE; starting with SLIM-Collaborate 5.0, the “Existing Project” option has been moved to a separate icon in the project list grid.
4. Review project settings to ensure that the trend group (benchmark reference group used to supply missing inputs and validate performance assumptions against relevant completed projects), sizing unit (example: function points, story points, etc.), application domain, and active lifecycle phases are appropriate for your new estimate. Remember: all project settings can be edited once the project is created. The goal here is to prepopulate as many fields as possible to reduce manual data entry. Your Back Office administrator can answer questions about the best template to use here if needed.
5. Review solution method and project settings inherited from the configuration source Before generating your first solution, it’s usually a good idea to review the settings supplied by your configuration source and make adjustments if needed, and decide on an appropriate solution method for the type of estimate being performed.
6.
Fill in solution assumptions and click OK to generate your first
solution!
Now that we’ve got
a high-level overview, the following topics will address the details for each
step.