Once again, the user interface for grouping differs, depending on the page or grid you are working with. The section provides directions for working with both types of grids.
Grouping differs from sorting in that it divides the list items into logically related sections determined by the column metric used. The screen snap below shows projects in the Project List grid grouped by Stage.

To group items in the Project List, simply select and drag a groupable column heading (generally, metrics like OBS or Stage, where metric values fall into discrete categories, make the most sense for grouping) into the row beneath the Project List toolbar at the top left corner of the page. Drop the dragged column icon into place near the vertical bar at the left edge of the toolbar. Items in the list will now be grouped into categories (Estimation or Closeout, in this case).
At the top of each grouping, a horizontal title bar appears, along with a count of records within the group. Lists can be grouped by multiple columns and grouped column metrics can be sorted within the group by sorting the entire column. An arrow next to the column heading indicates the sort order of the category groupings for each field (ascending or descending).

To collapse a group, click the down arrow at the far left of the group title bar. This feature is helpful for showing or hiding list contents, analyzing trends, or getting a quick count of records that meet a set of criteria. To ungroup the list, simply click the “X” to remove the metric from the grouped item row just under the page toolbar.
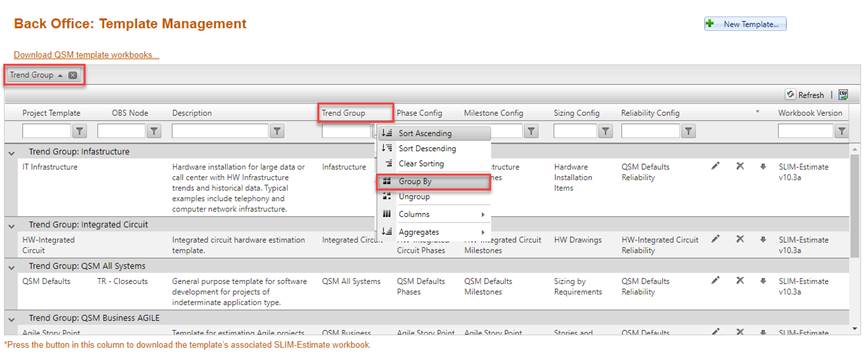
Back Office and Admin site grids have a different user
interface for grouping. To group items in these grids, right click on the
column name to bring up the popup menu. Select “Group By” to group list
items by the metric in the column heading. “Ungroup” clears the grouping and
returns the column to the default state. Note that not all columns can be
grouped. If you don’t see a “Group by” option in the popup menu when you
right-click the column heading, the grid cannot be grouped by that
metric.

Once you have grouped the list items, a horizontal title bar appears at the top of each grouping in the grid, along with a count of records within the group. Lists can be grouped by multiple columns. An arrow indicates the sort order of the group for each field (ascending or descending).

To collapse a group, click the down arrow at the far left of the group title bar. This feature is helpful for showing or hiding list contents, analyzing trends, or getting a quick count of records that meet a set of criteria. To ungroup the list, simply click the “X” or use the right click menu for the associated column heading.